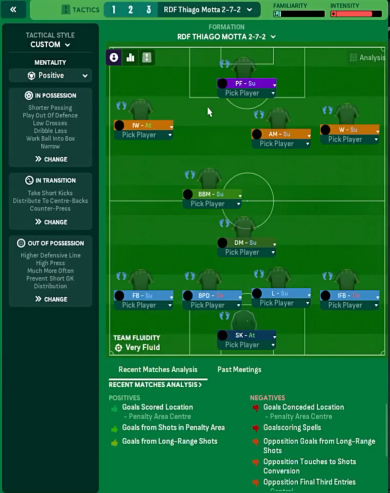
2-7-2-1 (Positive) Tactic
2-7-2-1
Utilizing the width and overlapping full-backs to stretch the opposition. The combination of a DLP and BBM allows for both defensive stability and…
Loading tactical analysis...
Formation and style
Custom
Positive
2-7-2-1
Very Fluid
In possession
Shorter Passing
Play Out of Defence
Work Ball Into Box
Overlap Left
Overlap Right
In transition
Distribute to Centre-Backs
Counter
Out of possession
Higher Defensive Line
Higher Line of Engagement
Prevent Short GK Distribution
Player roles
GK
Sweeper Keeper
Attack
CB
Ball-Playing Defender
Defend
CB
CM
Deep-Lying Playmaker
Support
CM
Box-to-Box Midfielder
Support
WM
Winger
Support
AM
Shadow Striker
Attack
ST
Pressing Forward
Support
Phase description
Creating opportunities through patient build-up and wide play.
Immediate counter-pressing to regain possession.
Utilizing the width and overlapping full-backs to stretch the opposition.
Team shape defence
Compact
Defensive line sits higher up the pitch to apply pressure.
Higher Defensive Line and Higher Line of Engagement.
Team shape attack
Fluid
Wide players and a shadow striker create gaps for the forwards.
Overlap Left and Overlap Right instructions.
Key strengths
Versatile Midfield
The combination of a DLP and BBM allows for both defensive stability and attacking progression.
DLP-S at [4,3] and BBM-S at [4,2].
High Pressing System
Utilizes the pressing forward to initiate high press and regain possession quickly.
Pressing Forward at [6,3] with 'Support' duty.
Conflicting tactics
Defensive Vulnerabilities
The high defensive line may expose the team to fast counter-attacks.
Higher Defensive Line and Higher Line of Engagement.
Midfield Congestion
The three midfielders may lead to crowding in the central area, limiting passing options.
Formation with three central midfield roles and overlapping wingers.
Risk exposures
Risk Exposures
Items
Defensive Transition
High defensive line exposes spaces behind for quick counters.
Higher defensive settings may lead to rapid counter-opposition.
Midfield Control
Three midfielders could lead to excessive density, reducing passing lanes.
Formation emphasizes width with potential congestion centrally.
Role synergies
Role Synergies
Items
DLP-S and BBM-S
Great balance between playmaking and box presence adds dynamism to midfield.
DLP-S at [4,3] combines with BBM-S at [4,2] for transitional play.
WM Support and Overlapping FBs
Wingers can stretch the play and benefit from overlaps creating numerical advantages.
Winger role at [5,2] with overlap instructions enhances width strategy.
Suggested questions
How can the defensive structure be improved to mitigate counter-attacks?
What adjustments are necessary to enhance midfield distribution?
Should the attacking players be repositioned for better synergy?
Guides for this tactic
The tactical theory behind the 2-7-2-1: roles, instructions, and the trade-offs that decide whether the system holds up.
Defensive Line and Line of Engagement
The pairing rule for Defensive Line and Line of Engagement, all 9 combinations, and the gap that costs goals.
Width, Compactness, and Tempo
What Higher Tempo, Wider, and Narrower actually do in FM, plus the dial contradictions and antipatterns players run into most often.
Wing Play vs Central Play
Build through the wide areas or through the middle? A working framework for picking the right one for your squad.