4-1-4-1 DM Asymmetric AM (L) Tactical Dashboard
Uploaded Tactic
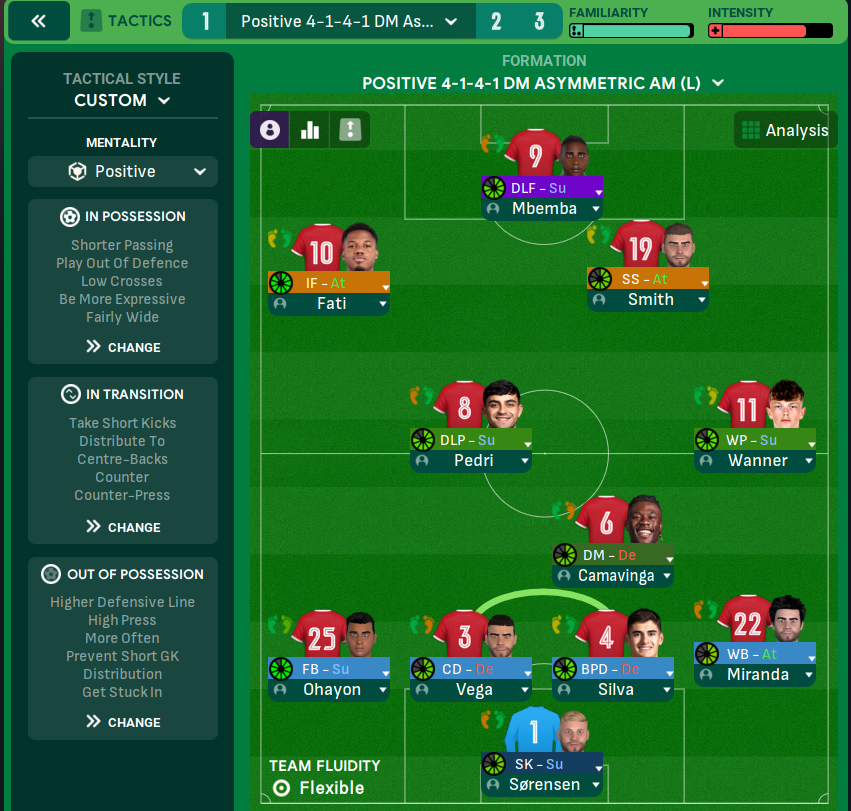
Formation & Style
In Possession
In Transition
Out of Possession
Team Shape Without Ball
No team shape without ball data available
Team Shape With Ball
No team shape with ball data available
Key Strengths
Fluid Midfield Play
The combination of a Deep-Lying Playmaker and a Defensive Midfielder allows for fluid ball progression, with options for both safety and creativity.
Dynamic Attack
Utilizing a Shadow Striker and an Inside Forward provides multiple attacking options and exploit opposition defenses, making it difficult for them to track players.
Effective Pressing
The High Press combined with a Counter-Press approach ensures that the opposition struggles to build up play, forcing turnovers in advantageous areas.
Width in Attack
The asymmetric nature of the formation, with a Wing Back and an Inside Forward, adds width, creating space for central players to operate.
Conflicting Directions
Press vs Defensive Line
While the High Press encourages aggressive defensive actions, a Higher Defensive Line may expose the back line to counter-attacks, especially against fast strikers.
Wide Play vs Central Tactics
The Inside Forward and Shadow Striker can clash in the central area, leading to overcrowding. It may hinder fluid movement in the attacking phase.
Defensive Midfielder's Role
Having a Defensive Midfielder on Defend duty might hinder the team’s ability to transition quickly into attack, limiting additional support in forward areas.
Goalkeeper's Role
The Sweeper Keeper role may conflict with the more cautious approach suggested by the higher defensive line, creating uncertainty in defensive situations.
Tactical Suggestions
Adjust Defensive Line
Consider lowering the defensive line to minimize vulnerability against fast counter-attacks and provide more cover for the midfield.
Role Adjustment for DM
Change the Defensive Midfielder to a Support role to provide more dynamism in midfield and assist in attacking transitions.
Rotate Player Duties
Consider rotating the Shadow Striker and Inside Forward roles more frequently to create unpredictability in attacking movements.
Use of Width
Encourage the Wing Back to overlap more with the Inside Forward to create width and stretch opposing defenses further.