Understanding the 4-3-3 Formation
Master the classic 4-3-3 formation with detailed analysis of player roles, team instructions, and tactical variations for different playing styles.
Formation Overview
The 4-3-3 has been a staple since Rinus Michels' Ajax of the early 1970s (the Total Football side built around Cruyff that won three consecutive European Cups). Guardiola's Barcelona (2008-2012) modernised the version most FM players try to recreate today. In Football Manager terms, what makes the shape distinct isn't its silhouette (four defenders, three central mids, three forwards); every guide says that. What matters is the load it puts on the central three: more vertical ground than a flat midfield four, more pressing duty than a 4-2-3-1, and a hard dependency on stamina and work rate that decides whether your tactic survives the 70th minute.
This guide uses FM24's duty system (Defend / Support / Attack); FM26 retired duties in favour of dual In-Possession / Out-of-Possession roles, so the duty pairings below translate to the FM26 role names but no longer attach a duty.
The roles you pick determine which of the three classical 4-3-3s you're actually running: possession (DLP at the base, IFs ahead, full-backs as the width), high press (DM-Defend, two B2B/Mez engines, Pressing Forward up top), or vertical counter (Anchor, CM-Sup, BBM, with wingers hunting the channels). The formation's weaknesses (the half-space behind the high winger, the gap in front of the back four when the lone striker drifts wide, and the 1v1 burden on each centre-back against two strikers) show up in every variant. Picking duties that match your mentality is the difference between a 4-3-3 that defends well and one that bleeds counters from the kickoff.
Key Strengths of 4-3-3 (FM-specific)
- • Three-man midfield with division of labour: One sits (DM/Anchor/DLP), two run (BBM, Mezzala, CM-Sup). You can stagger duties without leaving the back four exposed, which a 4-4-2 can't do.
- • Natural pressing geometry: Front three covers the back four directly; with a Pressing Forward up top and IFs on Support, you trigger high turnovers without needing a separate "high press" toggle to hold up.
- • Width that doesn't cost a wide midfielder: Wingers provide the touchline, but the central mids can still cover the half-spaces, so you're not picking between wide threat and central numbers.
- • Easy to morph in possession: Drop a DM between the CBs (the salida lavolpiana, a defensive midfielder dropping between the centre-backs in possession to form a temporary back three for build-up) and push the full-backs high to turn 4-3-3 into 3-2-5 without changing tactic.
Player Roles and Responsibilities
Defensive Line
The back four in a 4-3-3 formation provides the defensive foundation. Full-backs can either support attacks by overlapping or stay back to provide defensive security.
- Centre-Backs: Centre-Back or Ball-Playing Defender; Libero is technically selectable but pulls a CB out of the back line and is unusual in a flat 4-3-3
- Full-Backs: Full-Back Support/Attack, Wing-Back, Complete Wing-Back, or Inverted Wing-Back if you want the FB tucking inside in possession
Midfield Trio
The three-man midfield is the engine room of the 4-3-3. It can be configured for possession, pressing, or counter-attacking depending on your tactical approach.
- Defensive Mid (DM strata): Defensive Midfielder (De/Su/At), Deep-Lying Playmaker (De/Su/At), Anchor (Defend-locked), Half-Back (Defend-locked) for a CB-dropping pivot
- Central Mids (CM strata): Central Midfielder (De/Su/At), Box-to-Box Midfielder (Support-locked), Mezzala (FM24; Support/Attack, half-space carrier — renamed to Channel Midfielder in FM26), Advanced Playmaker (Support/Attack), Carrilero (FM24, Support-locked; renamed to Wide Covering CM in FM26) for a positionally disciplined shuttler
- Front three: Inside Forward, Inverted Winger, Winger out wide; Pressing Forward, Advanced Forward, Complete Forward, or False Nine through the middle
When to Use Which 4-3-3
The same formation runs three different ways depending on duties and instructions. Pick the variant that matches your squad's attributes, not the one that matches the team you wish you were managing.
Use when your CBs and DM can pass under pressure and your wingers prefer the ball to feet.
- • DLP (D) at the base
- • CM-Sup + Mez-Sup ahead
- • IF-Sup on both wings
- • Standard or Lower tempo, Shorter Passing, Work Ball Into Box
Use when you have stamina 15+ across the central three and a forward who'll actually press.
- • DM (D) holding
- • Two B2B/Mez (S) engines
- • Pressing Forward (A) up top
- • Higher line, More Urgent pressing, Counter-Press (only if line is Standard or Higher)
Use when you're outmatched and need a midfield that can absorb and break.
- • Anchor at the base
- • CM-Sup + BBM ahead
- • IF-Att on the strong side, WM-Sup on the weak side
- • Lower line, Standard pressing, Counter, Direct Passing
Common Weaknesses and Solutions
Vulnerability in Central Areas
With only three midfielders, you can be outnumbered in central areas against formations like 4-4-2 or 4-2-3-1.
Solution: Use one Box-to-Box and one Mezzala or CM(S); two B2Bs leave the DM exposed.
Isolated Striker
The single striker can become isolated against strong central defense partnerships.
Solution: Use Inside Forwards or an Advanced Playmaker to support the striker.
Wide Defensive Gaps
When full-backs attack, wide areas can be exposed to counter-attacks.
Solution: Use a Defensive Midfielder on Defend duty (or an Anchor) and instruct the ball-far winger to track back via Player Instructions.
Player Attributes That Matter Most
A 4-3-3 lives or dies on three attribute clusters that the formation depends on more than most. If you're scouting for this shape (or wondering why your existing 4-3-3 feels a step slow), these are the numbers to look at first.
- Centre-mid stamina and work rate (15+ at the top). A three-man midfield covers more vertical ground than a flat four. The two box-to-box mids in particular log enormous distances; if their stamina drops below 14 you'll see them arrive a yard late to challenges in the 70th minute, and that's where matches turn. At Premier League level, the stamina and work rate floor for the central three is 15+; in mid-table or lower-league saves you can drop to 12-13 with more rotation, but expect more drop-off in tight matches.
- Winger acceleration over pure pace. 4-3-3 wingers receive the ball in tight spaces with their backs to goal more often than wide-midfielders in a flat 4-4-2. Acceleration is what gets them away from the recovering full-back inside the first three yards. If your winger's acceleration is materially lower than their pace, they'll look slow even when their pace number says otherwise.
- Lone striker decisions and off the ball. The single forward in a 4-3-3 has to choose: drop in to combine, run the channel, or stay central. The attribute that decides whether they make the right choice is Decisions, supported by Off the Ball. A poacher with high finishing but mediocre decisions becomes invisible against deep blocks.
- Ball-playing centre-back composure. The 4-3-3's three-man midfield gets pressed easily on goal kicks; you need a centre-back who can split the press with one pass. Composure 13+ and Passing 13+ is the working floor. Drop below that and you'll see your DM dropping deeper to receive every ball, which then leaves your central mids isolated against the opposition's pivot.
How to Counter a 4-3-3
Worth knowing both ways: if you're playing one, knowing how to break it tells you where it leaks; if you're playing against one, this is where to apply pressure. The 4-3-3 has three classical weaknesses, and serious opponents will probe all of them.
The first is the half-space behind the wide forward. When your wingers push high to press, the channel between full-back and centre-back becomes a runway. A 4-2-3-1 with a runner from the half-space (Mezzala on Attack, CM-Att, or BBM) will exploit this every time. The fix isn't to drop your wingers deeper (that breaks the press), it's to ask the wing-side full-back to tuck inside and squeeze the channel, accepting that you'll cover the wide area later with the ball-near central mid.
The second is the area in front of the back four when the lone striker drifts wide. A patient opponent will draw your DM out by attacking down one flank, then switch play to the other and attack the gap your DM left. The fix is a midfield three with a true Anchor Man, not a roving DLP. The Anchor stays put and forces the switch to travel further than your back line takes to shuffle across.
The third is the 1v1 burden on each centre-back when the opposition plays two strikers. Against a 4-4-2 diamond, your two CBs will spend the match marking two strikers in isolation while your DM is busy with the AMC. If your CBs aren't quick, this gets ugly fast. You may need to drop into a 4-1-4-1 mid-match to give your DM permission to drop between the CBs.
Real-World Examples
The 4-3-3 has been the dominant top-level shape for nearly two decades, but the way top sides have used it varies a lot, and those variations are often what the presets in Football Manager are trying to copy.
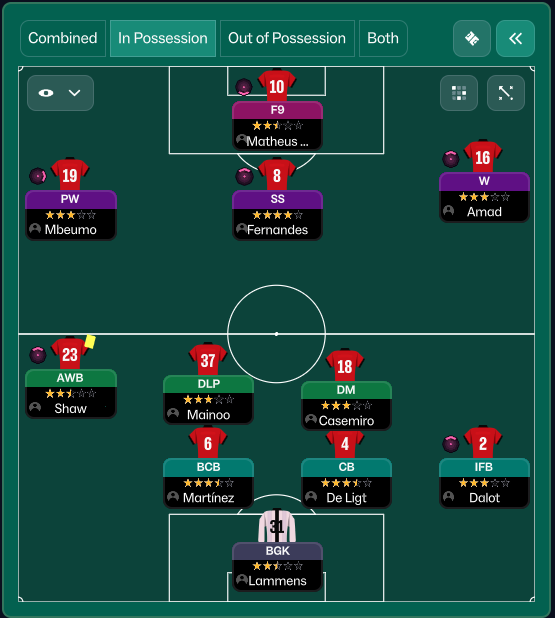
Pep Guardiola's Barcelona ran a possession 4-3-3 where the formation only existed on the team sheet. Out of possession it was 4-3-3, in possession it morphed into a 3-2-5 with Dani Alves pushing high and Sergio Busquets dropping between the centre-backs as a structural, named move (the salida lavolpiana). That drop was what created the 3 in 3-2-5, not an occasional choice. If you're trying to replicate this in FM, the closest analogue is Busquets as a Defensive Midfielder on Defend (or Half-Back if you want him dropping more aggressively into the back line) with Alves as a Wing-Back on Attack.
Jürgen Klopp's Liverpool ran a much more vertical 4-3-3. From 2017 through 2022 the key tactical choice was using Roberto Firmino as a deep-lying, pressing centre-forward who functioned like a false 9 in build-up: the lone striker dropped in, dragged a centre-back with him, and let Mané and Salah run the channels he vacated. To copy this in FM you set the central forward to False Nine, and crucially you do notset Pass Into Space. The False Nine wants the ball to feet, not into the space he just vacated.
Trent's structural inversion under Klopp emerged in spring 2023, with the right-back stepping into central midfield in possession to form a hybrid build-up shape. To copy this in FM, the closest analogue is an Inverted Wing-Back on the right paired with a different front-three profile, not a False Nine.
Worth noting that the formation on the team sheet rarely matches the shape you defend in: Simeone's Atlético lists as 4-4-2 but defends in a compact 4-4-1-1 with one striker dropping onto the opposition pivot, and the same logic applies in reverse to the 4-3-3s above; pay attention to in-possession and out-of-possession shape separately, not just the lineup graphic.
Frequently Asked Questions
Is the 4-3-3 too attacking for a relegation-battling team?
Not by itself. The 4-3-3 with a Defensive mentality, a true Anchor Man at DM, Inside Forwards on Support (not Attack), and a lone striker on Pressing Forward (Defend) is genuinely cautious. You'll just lose the press at the top end and the Anchor will absorb a lot of shots. The shape isn't the problem; the duties are. What you should avoid is pairing a Cautious mentality with two wingers on Attack, because in my experience the per-player duty tends to dominate the team mentality and you'll bleed counters.
Should my wingers be Inverted Wingers, Inside Forwards, or Wide Midfielders?
Different roles, different strengths. Inverted Wingers cut inside; shooting tendency depends on PPMs (Shoots from Distance, Cuts Inside From Both Wings) and PIs (Cut Inside With Ball, Shoot More Often) rather than the role itself; a left-footer on the right with a marauding full-back behind is the classic setup, but the role alone doesn't guarantee shots. Inside Forwards run beyond the striker, great if your lone forward holds up play. Wide Midfielders stay wide and cross, good if you have a target man and want width. If you don't know which you have, look at where the goals come from in your match analyser; if your winger is shooting, they're already an Inside Forward in everything but name, and you should give them the role.
Why does my 4-3-3 always concede in the 70th minute?
Almost always a stamina problem in the midfield three. The 4-3-3 demands more running than most setups, and if your two box-to-box mids are below 14 stamina they fade in the third quarter. The fix is either rotating those two aggressively (subbing them at 60 minutes), reducing pressing intensity from "Extremely Urgent" to "More Urgent" past the hour, or recruiting players with higher Natural Fitness alongside Stamina.
Can I run a 4-3-3 with only one good winger?
Yes, asymmetrically. Set the strong-side winger to Inside Forward on Attack and the weak-side winger to Wide Midfielder on Support, then have the strong-side full-back attack and the weak-side full-back defend. You'll create a 3-4-3 in-possession shape that overloads one flank and protects the other. This is a very common workaround in lower-budget teams.
What's the best 4-3-3 mentality for a newly-promoted side?
Cautious is the safe answer, but Balanced with conservative duties is often better, since you keep the option to break in transition without inviting pressure from the kickoff. The main thing newly promoted teams get wrong is pairing Counter-Press with a Lower Defensive Line: the front three sprint forward to press while the back four stays deep, opening a vertical gap large enough that the central three can't bridge it between them where you'll concede. Three fixes: raise the line to Standard (closes the gap to a midfield-coverable distance); raise it to Higher (compresses into a normal high-block band); or, if you genuinely need Lower, switch from Counter-Press to Regroup.
Conclusion
The 4-3-3 is three working variants on one base shape: the possession version (DLP-D anchoring two CM/Mez Supports, IF-Sup wide, F9 or CF-Sup central, Higher line), the pressing version (DM-D plus two B2B/Mez Supports, IF-Att wide, Pressing Forward up top, Higher line + More Urgent + Counter-Press), and the counter version (Anchor at the base, CM-Sup + BBM, IF-Att on the strong side with WM-Sup on the weak side, Lower line + Counter binary). Each variant is a consistent set of choices, not a free buffet; mixing duties across variants is where most uploaded 4-3-3 tactics break.
The single load-bearing dependency is the central three's stamina and work rate floor. The shape works in both directions only when those three players can repeat the press for ninety minutes; below the floor, the formation doesn't fail loudly, it just bleeds chances late and the average position map shows the gap that did the damage.
Related guides
Keep exploring the tactical library. These go well with the topic above.
Possession-Based Tactics in Football Manager
Build the patient, control-the-tempo style without watching your opponents counter through the gaps you leave behind.
Counter-Attacking Excellence
Sit deep, win the ball, and break in three passes. The roles, instructions, and squad profile that make it work.
Defensive Transitions
The five seconds after losing the ball decide most matches. Counter-press, drop-and-recover, and how to know which one you should be doing.