2-7-2 (Attacking) Tactic
2-7-2
Control of the midfield and exploiting spaces created by swift ball movement and player rotations. The combination of a Mezzala and Central Midfielder…
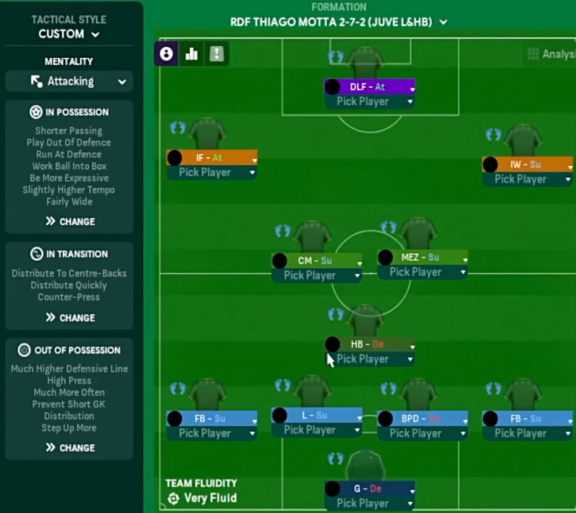
Loading tactical analysis...
Formation and style
Custom
Attacking
2-7-2
Very Fluid
In possession
Shorter Passing
Play Out Of Defence
Run At Defence
Work Ball Into Box
Be More Expressive
Slightly Higher Tempo
Fairly Wide
In transition
Distribute To Centre-Backs
Distribute Quickly
Counter-Press
Out of possession
Much Higher Defensive Line
High Press
Much More Often Prevent Short GK Distribution
Step Up More
Player roles
GK
RB
Full-Back
Support
CB
Ball-Playing Defender
LB
Full-Back
Support
DM
Half Back
Defend
CM
Central Midfielder
Support
AM
Mezzala
Support
RW
Inside Forward
Attack
LW
Inside Forward
Attack
ST
Deep-Lying Forward
Attack
Phase description
Focus on ball control and movement, utilizing inside forwards to stretch defenses and create space.
Quick counters with a focus on regaining possession through high pressing.
Control of the midfield and exploiting spaces created by swift ball movement and player rotations.
Team shape defence
2-3-5
Higher defensive line, inviting pressure but vulnerable to long balls.
Two central defenders (BPD at [2,3] and CB at [2,2]) with a high line strategy.
Team shape attack
3-5-2
Aggressive attacking with two inside forwards and one deep-lying forward providing flexibility in attack.
Inside forwards (IF at [6,2] & IF at [6,4]) supported by a Mezzala (MEZ at [4,3]) to supply the attack.
Key strengths
Fluid Midfield Play
The combination of a Mezzala and Central Midfielder facilitates quick transitions.
CM-S at [4,3] working alongside MEZ-S at [4,4].
Wide Attacking Threat
Inside forwards stretching the pitch offers width and creates goal-scoring opportunities.
IF-A at [6,2] and IF-A at [6,4] utilized in attack.
Conflicting tactics
High Defensive Line Risks
With only two defenders, this tactic increases vulnerability to counter-attacks.
High defensive line combined with a structure of only 2 defenders.
Overreliance on Midfield Transition
If midfield support lacks coverage, can leave the defence exposed during transitions.
Important roles in midfield (HB-D at [3,3] and CM-S at [4,2]) need robust positioning.
Risk exposures
Risk Exposures
Items
Defence
Two center-backs can struggle against pacey forwards.
2-Defender system increasing risk of isolation.
Midfield
A weak transition may leave the backline exposed.
High pressing may require quick recovery of possession.
Role synergies
Role Synergies
Items
Mezzala & Central Midfielder
Allows for flexible movement and support in attack.
MEZ-S at [5,3] with CM-S at [4,4] work together.
Inside Forwards & Deep-Lying Forward
Creates variety in attacking options; can interchange positions.
IF-A at [6,2] and DLF-A at [6,3] can exploit defensive weaknesses.
Suggested questions
How can I improve defensive solidity without sacrificing attacking intent?
What is the best way to manage player fatigue during high pressing?
Are there any specific player roles I should consider adjusting for better synergy?
Related Tactics
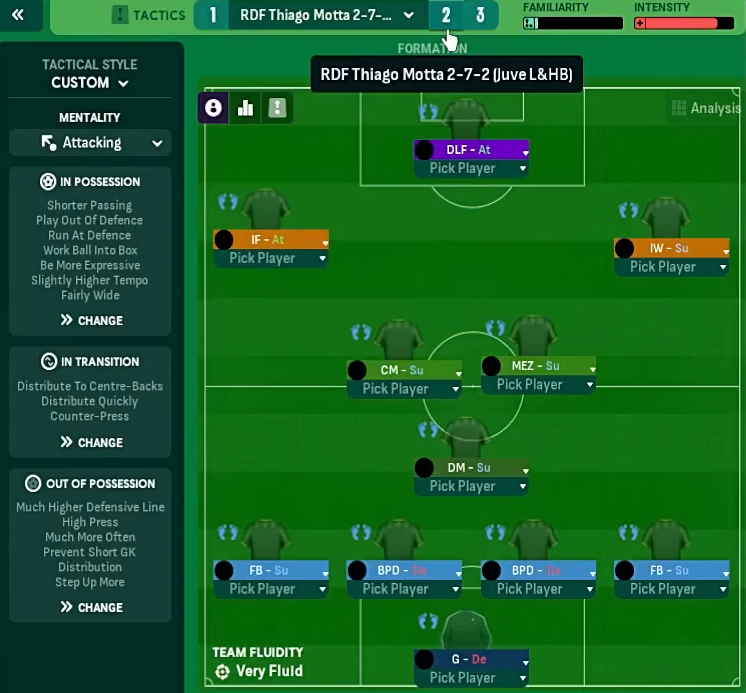
Guides for this tactic
The tactical theory behind the 2-7-2: roles, instructions, and the trade-offs that decide whether the system holds up.
Pressing Triggers and Intensity
Counter-Press, Regroup, Stand Off, Trigger Press: what each pressing instruction does in FM and how to pair them without contradicting.
Defensive Line and Line of Engagement
The pairing rule for Defensive Line and Line of Engagement, all 9 combinations, and the gap that costs goals.
Width, Compactness, and Tempo
What Higher Tempo, Wider, and Narrower actually do in FM, plus the dial contradictions and antipatterns players run into most often.