Uploaded Tactic
Formation & Style
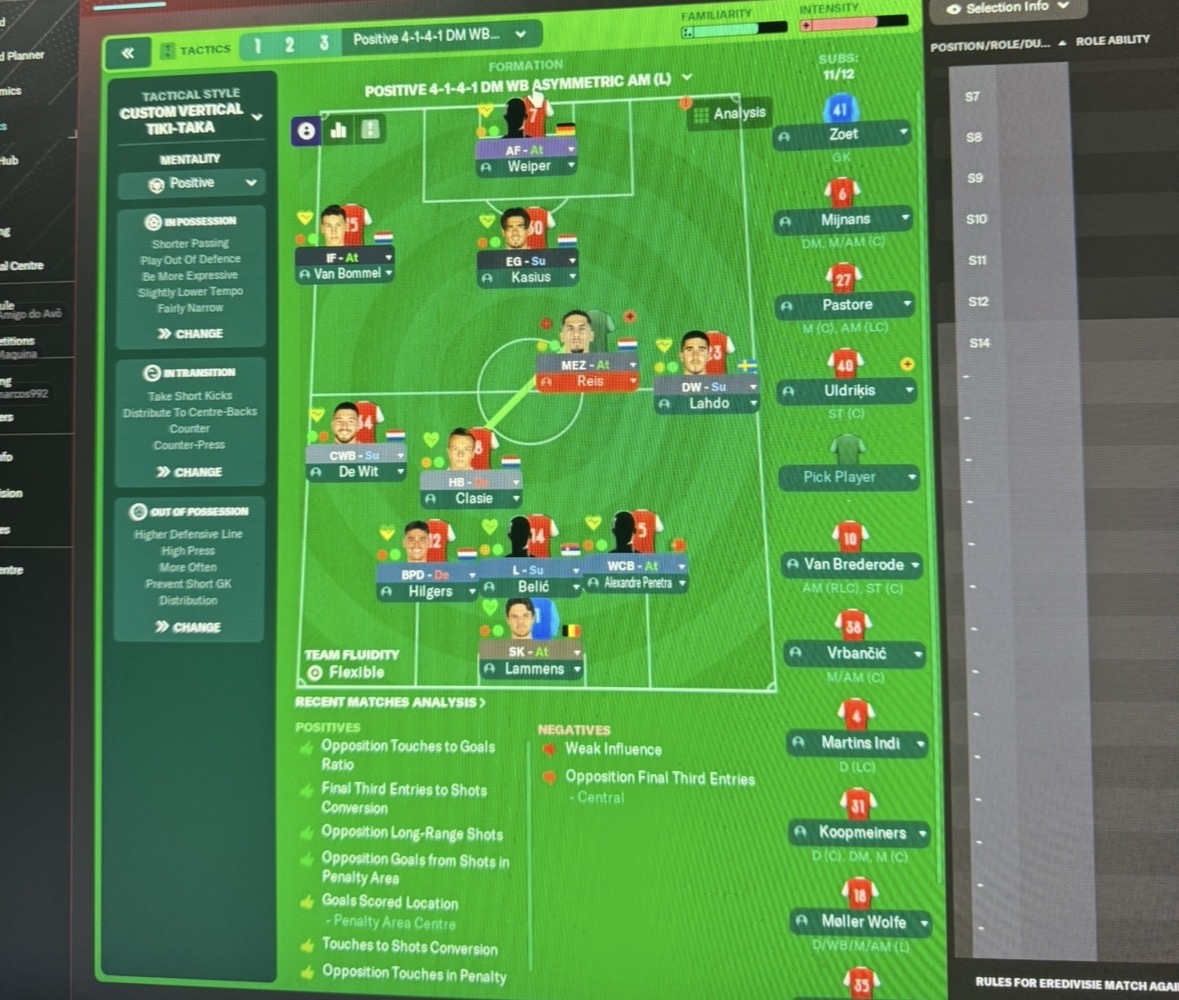
Tactical Style:Tiki-Taka
Mentality:Positive
Formation:4-1-4-1 DM WB Asymmetric AM (L)
Team Fluidity:Flexible
In Possession
Shorter Passing
Play Out Of Defence
Slightly Lower Tempo
Fairly Narrow
In Transition
Take Short Kicks
Distribute To Centre-Backs
Counter
Counter-Press
Out of Possession
Higher Defensive Line
High Press
Prevent Short GK Distributions
Team Shape Without Ball
Shape:4-1-4-1
Description:Compact formation with five players behind the ball, making it difficult for opponents to penetrate.
Evidence:Higher Defensive Line & High Press instructions indicate a proactive defensive approach.
Team Shape With Ball
Shape:4-1-4-1
Description:Asymmetrical attacking pattern with inside forwards and a mezzala for dynamic play.
Evidence:Utilization of roles like Inside Forward and Enganche enhances creativity and goal threat.
Phase Description
Attacking Play
Utilizes Tiki-Taka for patient build-up, focusing on short, precise passes to dismantle the opposition's defense.
Defensive Transition
Engages immediately to recover possession, utilizing counters and pressing opponents high to regain the ball.
Main Focus
Maintaining ball possession while creating scoring opportunities through staggered attacks and support from midfield.
Key Strengths
Possession Control
The Tiki-Taka style promotes short, controlled possessions that prioritize retaining the ball.
Dynamic Midfield Fusion
A combination of various midfield roles allows for flexibility in attack and defense.
High Pressing System
Effective high pressing can cause turnovers and create scoring opportunities.
Conflicting Directions
Over-reliance on Mezzala
The asymmetric setup relies heavily on the Mezzala for creativity, leaving other areas less utilized.
Vulnerable Wide Areas
The formation's structure may expose flanks due to the focus on center play.
High Defensive Line Risks
While a higher line can press effectively, it also invites risk if caught on the counter.
Tactical Suggestions
Consider Balanced Width
Adjusting the width to avoid crowding the midfield can create space for forward runs.
Utilize Full-Backs for Attacking Width
Encouraging the Complete Wing-Back to overlap can help stretch the defense and create opportunities.
Reevaluate Defensive Line Height
Adjusting the height based on opposition threats could mitigate counter risks.
Ask Questions About Your Lineup
Guides for this formation
The tactical theory behind the 4-1-4-1 DM WB Asymmetric AM (L): roles, instructions, and the trade-offs that decide whether the system holds up.