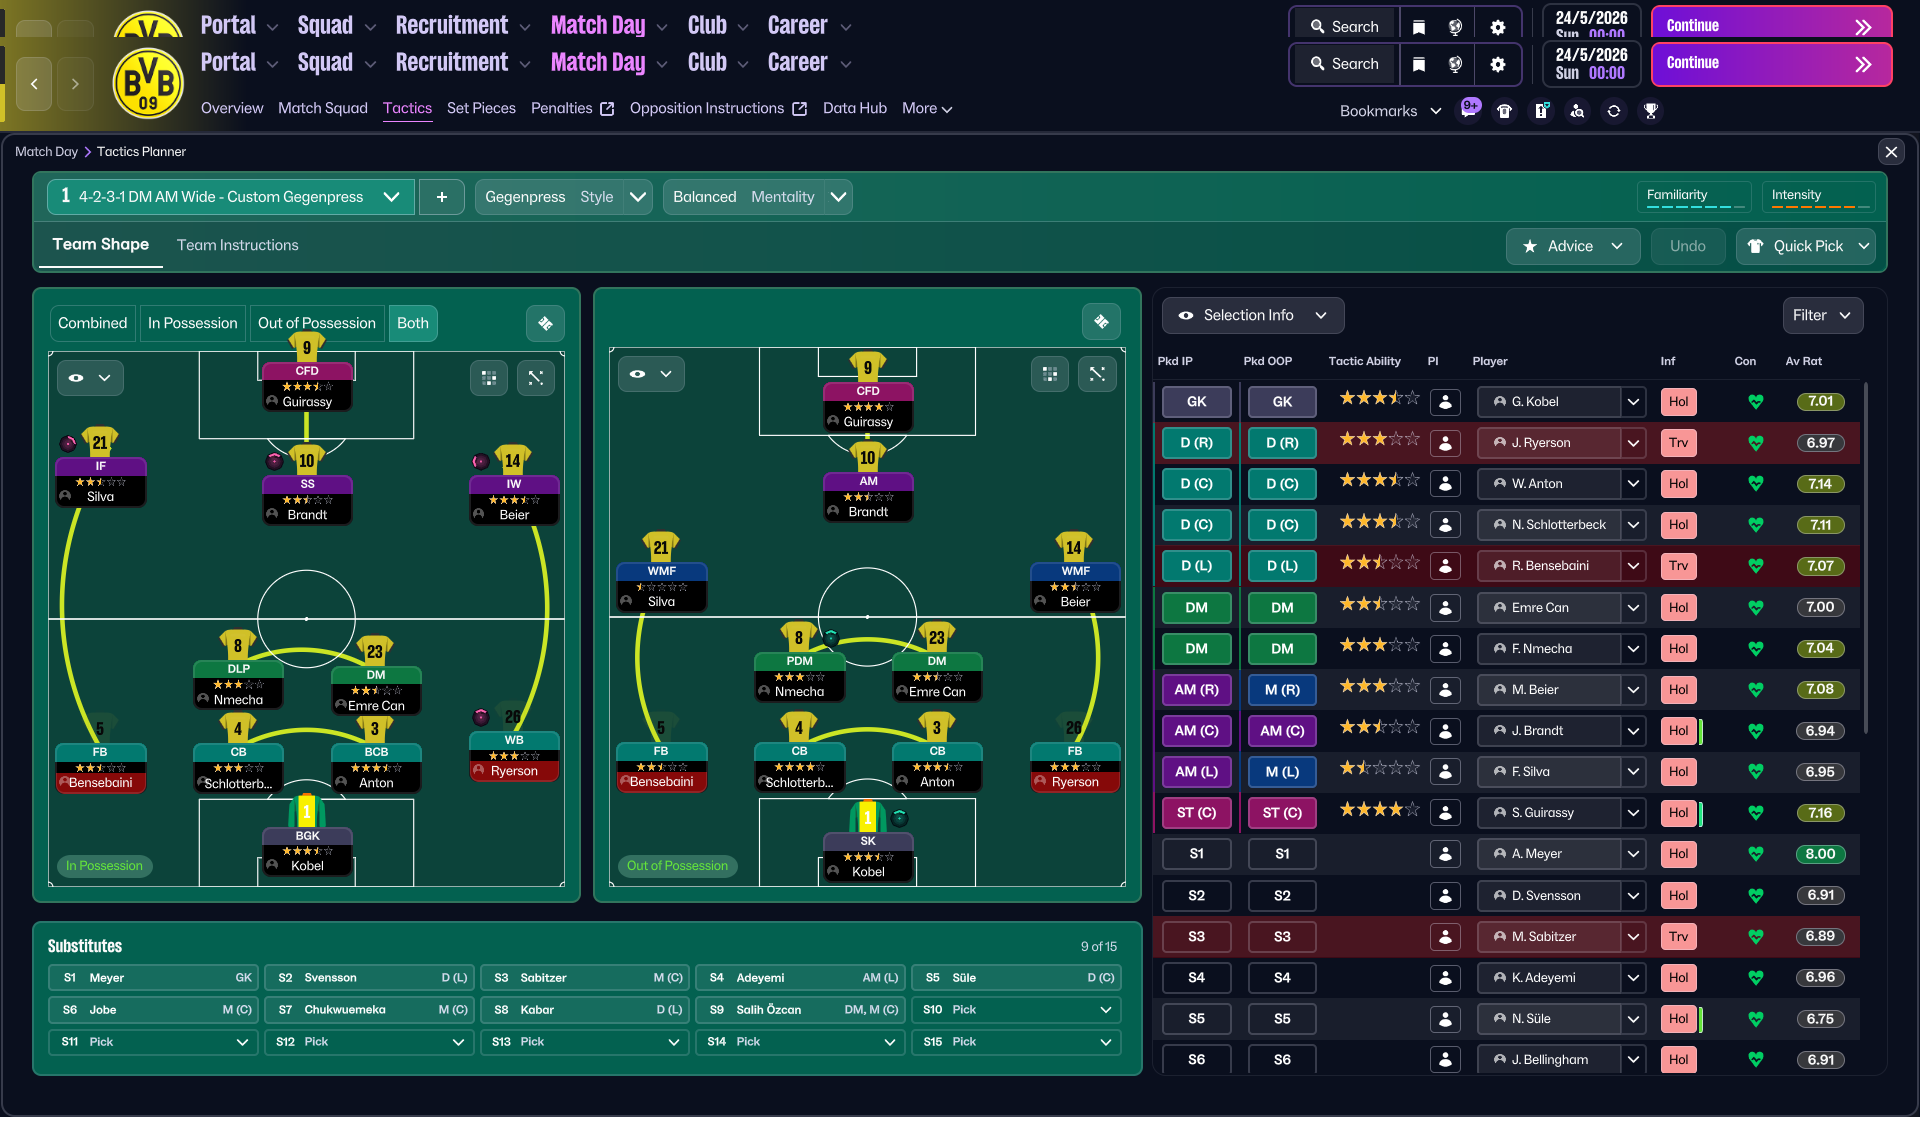
4-2-3-1 DM Wide (Positive) Tactic
4-2-3-1 DM Wide
Utilizing width and pace to penetrate defenses while maintaining a solid structure when not in possession. The attacking setup, with two inside forwards…
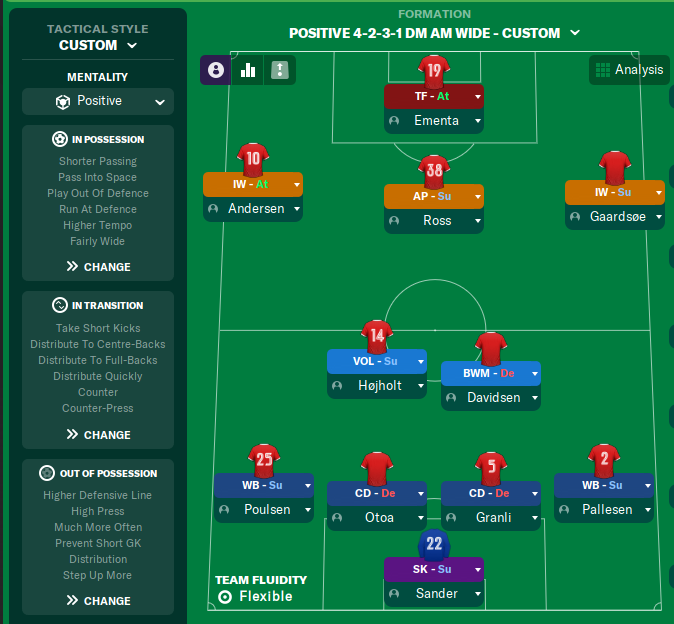
Loading tactical analysis...
Formation and style
Custom
Positive
4-2-3-1 DM Wide
Flexible
In possession
Shorter Passing
Pass Into Space
Run At Defence
Higher Tempo
Fairly Wide
In transition
Take Short Kicks
Distribute To Centre-Backs
Distribute To Full-Backs
Distribute Quickly
Counter
Counter-Press
Out of possession
Higher Defensive Line
High Press
Prevent Short GK Distribution
Step Up More
Player roles
GK
Sweeper Keeper
Support
LB
Wing-Back
Support
CB
Centre-Back
Defend
CB
Centre-Back
Defend
RB
Wing-Back
Support
DM
Volante
Support
DM
Ball-Winning Midfielder
Defend
AM
Advanced Playmaker
Support
LW
Inside Forward
Attack
RW
Inside Forward
Support
ST
Target Forward
Attack
Phase description
The team plays with a focus on quick ball movement and penetration through the wings, with inside forwards cutting inside to create chances.
Upon losing possession, the team aims to press high, regain the ball quickly, and capitalize on counter-attacks.
Utilizing width and pace to penetrate defenses while maintaining a solid structure when not in possession.
Team shape defence
Compact 4-2-3-1
The team maintains a compact structure, with the two holding midfielders screening the defensive line while wing-backs track opposition wingers.
BWM-D at [3,2] and VOL-S at [3,3] provide defensive cover and protection to the back four.
Team shape attack
Fluid attacking shape
Offering width in attack allows inside forwards and the Advanced Playmaker to exploit spaces created by the full-backs overlapping.
IW-A at [6,1] and IW-S at [6,5] combined with AP-S at [5,3] create multiple attacking options.
Key strengths
Dynamic Attack
The attacking setup, with two inside forwards and a target man, provides varied avenues for scoring.
IW-A at [6,1] and TF-A at [6,3] present a dual threat in front of goal.
Ball Recovery
The high press and counter-press strategies aid in quickly regaining possession.
High Press instruction combined with BWM-D at [3,2] helps in recovering the ball effectively.
Conflicting tactics
Potential Vulnerability on Counter
The high defensive line may leave spaces behind that could be exploited by rapid counter-attacks.
Higher Defensive Line instruction may lead to vulnerabilities against quick opponents taking advantage of space.
Lack of Central Presence
The focus on attacking width can sometimes leave the central area exposed.
The use of two inside forwards might isolate the Advanced Playmaker, reducing central attacking options.
Risk exposures
Risk Exposures
Items
Defensive Transition
High pressing can leave gaps if the press fails, especially during transitions.
Counter-Press combined with Higher Defensive Line can expose center-backs quickly.
Attack Pattern Predictability
Overreliance on wings might make the attack predictable and easier to defend against.
With multiple inside forwards, if pushed wide, the team may struggle for creativity in central spaces.
Role synergies
Role Synergies
Items
Volante and Ball-Winning Midfielder
This pairing provides both defensive cover and offensive support, balancing offensive and defensive responsibilities.
VOL-S at [3,3] supports BWM-D at [3,2] improving ball recovery and quick transitions.
Inside Forwards and Advanced Playmaker
Creates synergistic attacking combinations to dissect defenses effectively.
IW-A at [6,1] and AP-S at [5,3] work together to exploit central openings while inside forwards cut in.
Suggested questions
How can you adjust the formation if facing a more physical opponent?
What adjustments can be made during the game if the press isn't effective?
How can you diversify attacking options to prevent predictability?
Related Tactics
Guides for this tactic
The tactical theory behind the 4-2-3-1 DM Wide: roles, instructions, and the trade-offs that decide whether the system holds up.
Playing styles
Gegenpressing: A Full Guide
Klopp-style gegenpressing in FM, including squad profile, line-and-press pairing, sustainable workload, and the antipatterns to avoid.
Read guide
Player pairings
Midfield Pairs in 4-2-3-1 and 4-4-2
Double pivots and flat pairs in 4-2-3-1 and 4-4-2: when each pairing works, when it collapses, and the AMC unicorn that rescues both.
Read guide
Match preparation
In-Match Tactical Changes
Mentality, duty, role, instruction, sub. The change hierarchy from lightest to heaviest intervention, and 60th-minute patterns by game state.
Read guide