YNWA 4-2-3-1 (Attacking) Tactic
4-2-3-1
Attacking play through width and quick passing to break down defenses. The combination of an Advanced Forward and Inside Forwards creates movement and…
Loading tactical analysis...
Formation and style
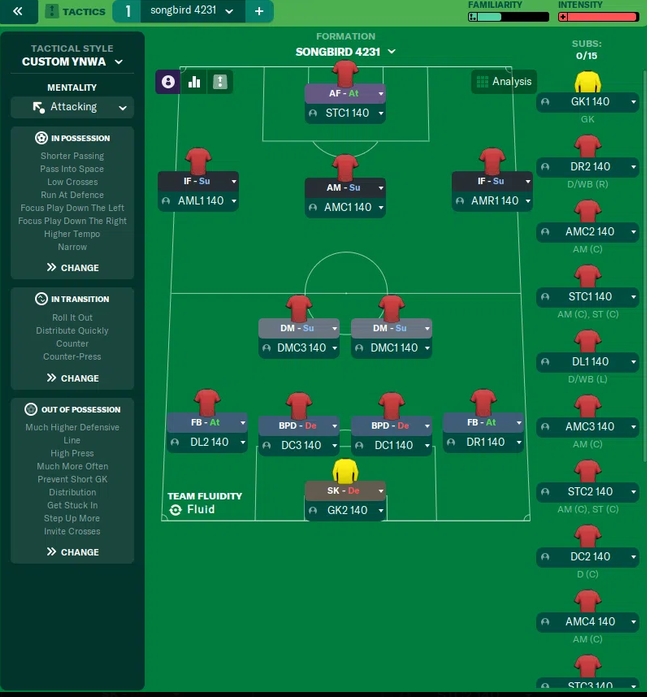
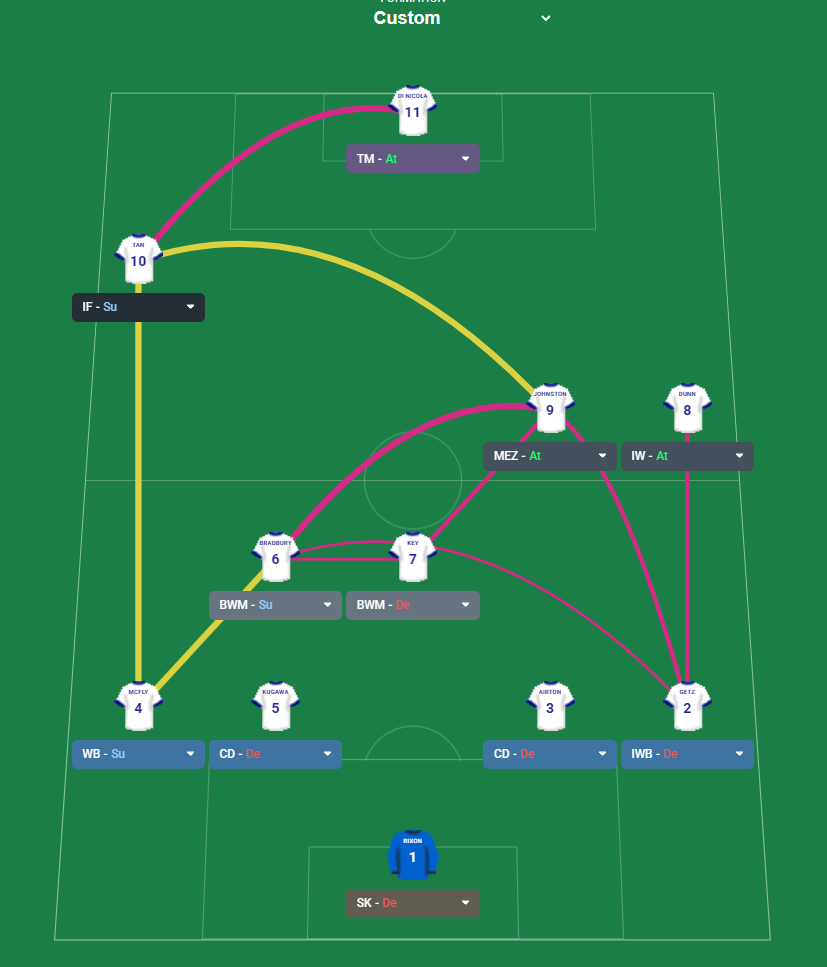
Custom YNWA
Attacking
4-2-3-1
Fluid
In possession
Shorter Passing
Pass Into Space
Low Crosses
Run At Defence
Focus Play Down The Left
Higher Tempo
Narrow
In transition
Roll It Out
Distribute Quickly
Counter
Counter-Press
Out of possession
Much Higher Defensive Line
High Press
Much More Often
Prevent Short GK Distribution
Get Stuck In
Step Up More
Invite Crosses
Player roles
GK
Sweeper Keeper
Defend
CB
Ball-Playing Defender
Defend
CB
Central Defender
Defend
FB
Full-Back
Attack
FB
Full-Back
Attack
DM
Defensive Midfielder
Support
DM
Defensive Midfielder
Support
AM
Advanced Playmaker
Support
IF
Inside Forward
Support
AF
Advanced Forward
Attack
Phase description
Utilizes quick transitions and works to exploit space down the flanks, focusing on wide play through Inside Forwards and overlapping Full-Backs.
Engages in high pressing to recover possession quickly, with a commitment to counter-pressing.
Attacking play through width and quick passing to break down defenses.
Team shape defence
High Defensive Line
A proactive approach, pushing the defensive line higher up the pitch to compress the space available to the opposition.
Much Higher Defensive Line at [2,1] and [2,5] with High Press instruction.
Team shape attack
Fluid 4-2-3-1
The attacking shape prioritizes width with Inside Forwards and Full-Backs working together for overlaps.
AM-S at [5,2] supports AF-A at [6,3], enabling compact combination plays.
Key strengths
Dynamic Attacking Play
The combination of an Advanced Forward and Inside Forwards creates movement and unpredictability in the attacking third.
AF-A at [6,3] with AM-S at [5,2] and IF-S at [6,1] creating fluid attacking options.
Effective Width Utilization
Full-Backs on attacking duties provide width while the Inside Forwards cut inside, creating mismatches.
FB-A at [2,1] and FB-A at [2,5] with Focus Play Down The Left.
Conflicting tactics
Vulnerability to Counter-attacks
The high defensive line can be exploited if caught on the break.
Much Higher Defensive Line discussed with DM-S roles, leaving gaps upon transition.
Reliance on Full-Backs
Excessive reliance on Full-Backs to provide width may overexpose the flanks defensively.
FB-A at [2,1] and FB-A at [2,5] with limited defensive cover during attacking transitions.
Risk exposures
Risk Exposures
Items
Counter-attack Vulnerability
The high defensive line may leave spaces for quick counters from the opposition.
Much Higher Defensive Line and pressing tactics create space for opponents.
Flank Exploitation
Overcommitting Full-Backs can make the team susceptible to wing attacks.
Both FB-A roles positioned far up the pitch, leaving gaps behind.
Role synergies
Role Synergies
Items
Advanced Forward & Inside Forward
These roles can interchange well, creating space and openings for one another.
AF-A positioned at [6,3] with IF-S overlapping at [6,1] to confuse defenses.
Defensive Midfielders & Centre-Backs
Dual DM roles provide necessary coverage and support for the defense as well as transition quickly.
DM-S positioned at [3,2] and [3,3] effectively protect CBs at [2,2] and [2,3].
Suggested questions
How effective has the high pressing strategy been in recovering the ball?
Are the Full-Backs finding a good balance between attacking and defensive duties?
Would experimenting with different midfield roles yield more creativity?
Related Tactics
Guides for this tactic
The tactical theory behind the 4-2-3-1: roles, instructions, and the trade-offs that decide whether the system holds up.
Playing styles
Gegenpressing: A Full Guide
Klopp-style gegenpressing in FM, including squad profile, line-and-press pairing, sustainable workload, and the antipatterns to avoid.
Read guide
Player pairings
Midfield Pairs in 4-2-3-1 and 4-4-2
Double pivots and flat pairs in 4-2-3-1 and 4-4-2: when each pairing works, when it collapses, and the AMC unicorn that rescues both.
Read guide
Foundations
FM27 Tactics: What Changed from FM26
FM27 keeps FM26's tactic system. Here is what stays the same, the small changes that can catch you out, and what the new Tactical Effectiveness system asks of you.
Read guide